-
RxDataSources + 컬렉션 뷰(Swift)iOS/Swift 2022. 2. 16. 04:32
안녕하세요! 오늘은 RxDataSources를 CollectionView와 함께 사용하는 방법에 대해서 정리해보았습니다.
바로 시작하겠습니다 🐶
RxDataSources란?
테이블뷰와 컬렉션뷰의 DataSource의 내용을 좀 더 쉽게 관리하기 위한 라이브러리
왜 쓰게 되었나....
프로젝트를 하면서 다음과 같은 UI를 만들어야했다.
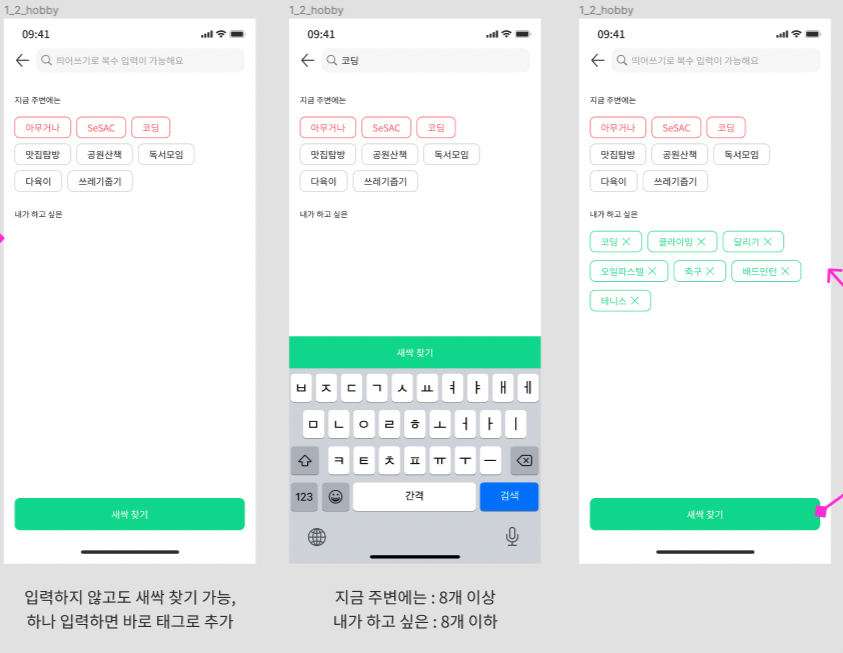
여기서, [내가 하고 싶은] 섹션에 추가되는 버튼은 서치바를 통해서 입력할 수도 있고,
[지금 주변에는] 섹션에 있는 버튼을 클릭하는 것으로 추가할 수도 있었다.
어떻게 이 UI를 구현할지 팀원들과 회의를 가졌다.
그렇게 나왔던 결론이 보통 하나의 섹션에 바인딩을 하는 것이라면 RxCocoa에서 제공해주는 방법을 사용해도 되겠지만,
섹션이 여러개이고, 테이블뷰와 컬렉션뷰의 Cell에 여러가지 기능이나 애니메이션이 있을 때에는
RxDataSources를 사용하는 것이 적합하다고 이야기가 나왔다.
사용
먼저, RxDataSources를 추가해주어야 한다.
pod 'RxDataSources'cocoaPod을 통해 라이브러리를 프로젝트에 추가해주었다.
그리고 컬렉션 뷰 섹션에서 Section Model을 만들어주어야 한다!!
struct HobbySection {
    let header: String
    var items: [String]
}

extension HobbySection: AnimatableSectionModelType {
    typealias Item = String

    var identity: String {
        return header
    }

    init(original: HobbySection, items: [String]) {
        self = original
        self.items = items
    }
}
보통 item에 커스텀한 데이터 모델을 넣어주는 것 같지만,
어차피 아이템을 문자열로만 받기 때문에, 따로 데이터 모델을 설정해주지는 않았다.
이곳에 커스텀한 데이터 모델을 넣어주기 위해서는,
커스텀 데이터 모델이 Equatable, IdentifiableType를 준수해야한다.
🐶 추가 커스텀 데이터 모델 적용하기
struct Hobbies: Hashable {
    let hobby: String
    let type: HobbyType

    init(hobby: String, type: HobbyType) {
        self.hobby = hobby
        self.type = type
    }
}

extension Hobbies: IdentifiableType, Equatable {
    var identity: String {
        return UUID().uuidString
    }
}

enum HobbyType {
    case fromUser
    case fromServer
    case userSelected
}
위와 같이 IdentifiableType, Equatable 프로토콜을 채택한 뒤,
struct UserHobbySection {
    let header: String
    var items: [Hobbies]
}

extension UserHobbySection: AnimatableSectionModelType {
    typealias Item = Hobbies

    var identity: String {
        return header
    }

    init(original: UserHobbySection, items: [Hobbies]) {
        self = original
        self.items = items
    }
}
다음과 같이 섹션 모델에 적용해 주면 된다!!
header는 섹션의 title에 들어갈 프로퍼티다.
extension을 통해서는 애니메이션을 사용할 것이기 때문에 AnimatableSectionModelType 프로토콜을 채택했다.
프로토콜을 준수해야하니까 관련된 값들에 초기화를 해주면, SectionModel이 하나 만들어주었다.
다음은 dataSource 객체를 정의해주어야 한다.
뷰 컨트롤러에서 객체를 정의해주었다.
private let dataSource = RxCollectionViewSectionedAnimatedDataSource<HobbySection> { (datasource, collectionView, indexPath, item) in
        guard let cell = collectionView.dequeueReusableCell(withReuseIdentifier: EnterHobbyCollectionViewCell.reuseIdentifier, for: indexPath) as? EnterHobbyCollectionViewCell else { return UICollectionViewCell() }

        cell.button.setTitle("메뉴: \\(item)", for: .normal)
        cell.backgroundColor = .brandGreen

        return cell
    }
dataSource로 RxCollectionViewSectionedAnimatedDataSource 클래스를 생성해줬는데, 이 클래스는 SectionModelType를 타입으로 받고있다. 생성자로 두가지 메서드 중 하나를 선택할 수 있는데,
public init(
        animationConfiguration: AnimationConfiguration = AnimationConfiguration(),
        decideViewTransition: @escaping DecideViewTransition = { _, _, _ in .animated },
        configureCell: @escaping ConfigureCell,
        configureSupplementaryView: ConfigureSupplementaryView? = nil,
        moveItem: @escaping MoveItem = { _, _, _ in () },
        canMoveItemAtIndexPath: @escaping CanMoveItemAtIndexPath = { _, _ in false }
        ) {
        self.animationConfiguration = animationConfiguration
        self.decideViewTransition = decideViewTransition
        super.init(
            configureCell: configureCell,
            configureSupplementaryView: configureSupplementaryView,
            moveItem: moveItem,
            canMoveItemAtIndexPath: canMoveItemAtIndexPath
        )
    }
매개변수로 설정할 수 있는 옵션이 매우 다양한 것 같다. 일단 처음으로 사용해보는 것이라서 configureCell만 사용해보기로 했다.
컬렉션 뷰 셀은 버튼이 하나 있는 셀을 임시로 만들어서 사용했다.
그리고, 임시로 사용할 목데이터를 만들어주었다.
private let mockSession = [
        HobbySection(header: "첫번째 섹션", items: ["김치", "삼계탕", "불고기"]),
        HobbySection(header: "두번째 섹션", items: ["짜장면", "탕수육", "마라탕", "마라샹궈"]),
        HobbySection(header: "세번째 섹션", items: ["스시", "우동", "텐동", "타코야끼"]),
    ]
이 데이터를 컬렉션 뷰에 연결시키면, 세 개의 섹션으로 나누어지고 각각의 섹션은 items에 맞는 버튼을 가져야 한다.
이제 이 목데이터를 연결시켜주면 된다.
일단 ViewDidLoad에서 Observable을 이용해 컬렉션뷰와 목데이터를 연결했다.
override func viewDidLoad() {
        super.viewDidLoad()
        searchBarConfig()

        Observable.just(mockSession)
            .bind(to: mainView.collectionView.rx.items(dataSource: dataSource))
            .disposed(by: disposeBag)
    }
그리고 시뮬레이터를 실행시키면,
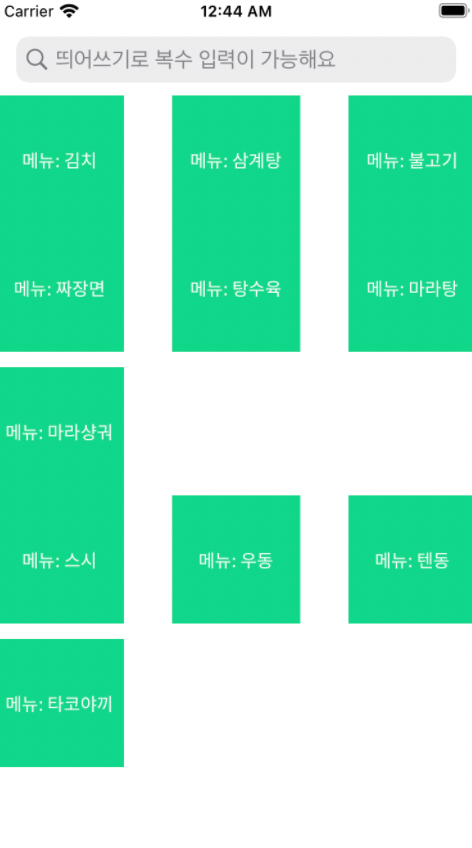
데이터를 잘 받아오는 것을 볼 수 있다.
근데 왜 섹션 헤더는 안나오는거지??
라고 생각했는데, 헤더를 등록을 안해주었기 때문에 나타나지 않았다.
컬렉션 뷰에 헤더를 등록했다.
collectionView.register(EnterHobbyCollectionViewSectionHeader.self,
                                forSupplementaryViewOfKind: UICollectionView.elementKindSectionHeader,
                                withReuseIdentifier: EnterHobbyCollectionViewSectionHeader.reuseIdentifier)
그리고 dataSource를 만드는 생성자에서 configureSupplementaryView를 추가해주었다.
private var dataSource = RxCollectionViewSectionedAnimatedDataSource<HobbySection>(configureCell: { (datasource, collectionView, indexPath, item) in
        guard let cell = collectionView.dequeueReusableCell(withReuseIdentifier: EnterHobbyCollectionViewCell.reuseIdentifier, for: indexPath) as? EnterHobbyCollectionViewCell else { return UICollectionViewCell() }

        cell.button.setTitle("메뉴: \\(item)", for: .normal)

        switch indexPath.section {
        case 0:
            cell.button.buttonState = .fill
        case 1:
            cell.button.buttonState = .outline
        default:
            cell.button.buttonState = .inactive
        }

        return cell
    }, configureSupplementaryView: { (dataSource, collectionView, kind, indexPath) in
        print("Kind: \\(kind)")
        switch kind {
        case UICollectionView.elementKindSectionHeader:
            guard let header = collectionView.dequeueReusableSupplementaryView(ofKind: kind, withReuseIdentifier: EnterHobbyCollectionViewSectionHeader.reuseIdentifier, for: indexPath) as? EnterHobbyCollectionViewSectionHeader else {
                return UICollectionReusableView()
            }
            header.headerLabel.text = dataSource[indexPath.section].header
            header.backgroundColor = .systemTeal
            return header
        default:
            assert(false, "Unexpected element kind")
        }
    })
configureSupplementaryViews는 헤더뷰나 푸터뷰를 작성할 때 사용하는 매개변수다.
그리고 다시 시뮬레이터를 실행하면,

원하는 대로 섹션이 나누어져서 나오는 것을 확인할 수 있다!
'iOS > Swift' 카테고리의 다른 글
(RxSwift)API 호출 시점이 많을 때, 효율적으로 관리하기 (0) 2022.02.23 UICollectionView Compositional Layout (0) 2022.02.17 Firebase Auth 적용하기(전화번호 인증, Swift) (0) 2022.02.04 앱에 Firebase Crashlytics 추가(Swift) (0) 2022.01.27 Swift PHPicker로 여러 이미지를 가져오기 (0) 2022.01.22