-
Realm-cocoa 라이브러리 활용해보기(Swift)iOS/Swift 2022. 1. 22. 20:50
안녕하세요!! 이번엔 Swift에서 realm을 사용하는 방법에 대해서 정리했습니다.
이번 글도 노션에서 옮겨와 말이 짧습니다!! 양해해주세용😽
Realm이란?
오픈소스 데이터베이스 관리 시스템(DBMS)으로, 모바일 환경을 주 타겟으로 잡은 데이터베이스 라이브러리다.
왜 써야 하는데??
서버와 통신하지 않고 데이터를 저장해둘 필요가 있을 때, 그동안은 UserDefaults를 이용해왔다.
UserDefaults에는 사용자 기본 설정같은 가벼운 데이터만 저장하고 많은 양의 데이터를 저장하기엔 적합하지 않다는 말들을 들어왔다. 왜 그런지 검색을 해보면 UserDefaults에 담을 수 있는 용량에 제한이 있기도 하고, 대용량의 데이터를 처리할 때에는 UserDefaults가 다른 데이터베이스들보다 느려서 그런 것 같다.
SQlite, Core Data 말고 왜 굳이 Realm을 쓰냐고 물으면, 첫번째는 빠른 속도 때문이다.
벤치마킹 결과에서 다른 데이터베이스들보다 쿼리를 읽는 속도가 월등히 빨랐다.

두번째는 호환성이다. 크로스 플랫폼이기 때문에 iOS 뿐만 아니라 안드로이드에서도 Realm을 사용가능하다.
세번째 이유는 현업에서 많이 사용되고 있기 때문이다. 카카오, 멜론, 뱅크샐러드 등 많은 기업에서 Realm을 사용하고 있다고 한다.
Realm 사용해보기
SPM에 추가
PROJECT → Package Dependencies에서 추가 가능하다.
Dependency Rule에서 Exact Version으로 설정 후, 10.18.0 버젼으로 추가해주었다.(이 때의 최신 버젼)
그리고 추가했으면 한번 빌드해주면 된다.(첫 빌드에는 시간이 꽤 오래걸린다....)
Realm 모델 추가
Realm에서 관리할 데이터 모델을 정의해주어야 한다.
Realm API Docs에 많은 예시들이 있다.
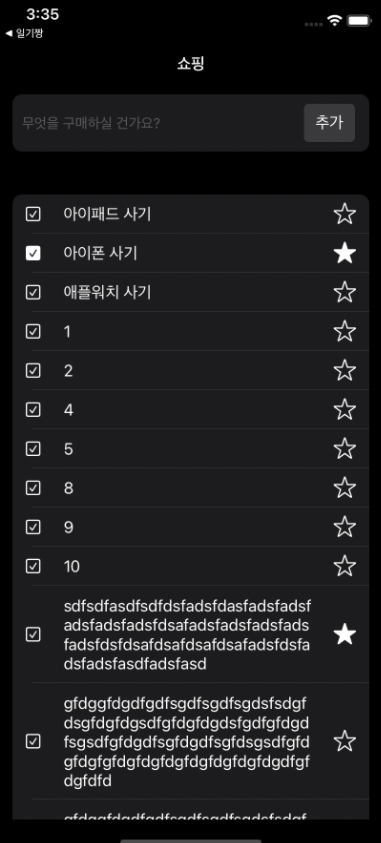
위 이미지의 테이블 뷰에서 Realm을 이용할 것이므로, ShoppingItem이라는 클래스를 만들고 정의해두었다.
import Foundation
import RealmSwift // Realm이 아닌 RealmSwift를 import 해주어야 한다.

class ShoppingItem: Object {
    @Persisted var checked: Bool
    @Persisted var text: String
    @Persisted var stared: Bool

    convenience init(checked: Bool, text: String, stared: Bool) {
        self.init()
        self.checked = false
        self.text = text
        self.stared = false
    }
}
그리고 뷰컨트롤에서 Realm 객체를 선언해준다.
let localRealm = try! Realm()그리고 기존의 추가 버튼을 눌렀을 때의 이벤트를 수정해주면 된다.
// 기존 코드
@IBAction func addList(_ sender: UIButton) {
        if !(textField.text!.isEmpty) {
            shoppingList.append(ShoppingModel(checked: false, text: textField.text!, stared: false))

        } else {
            let alert = UIAlertController(title: nil, message: "내용을 입력해주세요.", preferredStyle: .alert)
            let okButton = UIAlertAction(title: "확인", style: .default, handler: nil)
            alert.addAction(okButton)
            present(alert, animated: true, completion: nil)
        }
    }
// 새로운 코드
@IBAction func addList(_ sender: UIButton) {
        guard let text = textField.text, !(text.isEmpty) else {
            let alert = UIAlertController(title: nil, message: "내용을 입력해주세요.", preferredStyle: .alert)
            let okButton = UIAlertAction(title: "확인", style: .default, handler: nil)
            alert.addAction(okButton)
            present(alert, animated: true, completion: nil)
            return
        }

        // 이 부분이 Realm에 Data를 저장하는 부분!
        let task = ShoppingItem(checked: false, text: text, stared: false)
        try! localRealm.write {
            localRealm.add(task)
        }
    }
realm.write { realm.add(정의한 오브젝트) } 로 Realm에 데이터를 추가할 수 있다.
그럼 데이터가 어디에 저장되어 있는지는 어떻게 볼 수 있을까?
데이터를 추가하고, viewDidLoad에 다음 코드를 추가하면 경로를 확인할 수 있다.
print("Realm is located at:", localRealm.configuration.fileURL!)

/* 시뮬레이터 실행시 디버그 영역에
Realm is located at:
file:///Users/y.b/Library/Developer/CoreSimulator/Devices/40E97071-337B-44B0-BD43-311ADCBE4447/data/Containers/Data/Application/D09797EB-CE25-4783-8068-DD8745EC688B/Documents/default.realm
로 표시가 된다. 해당 경로를 찾아가보면, Realm 파일을 찾을 수 있다.
*/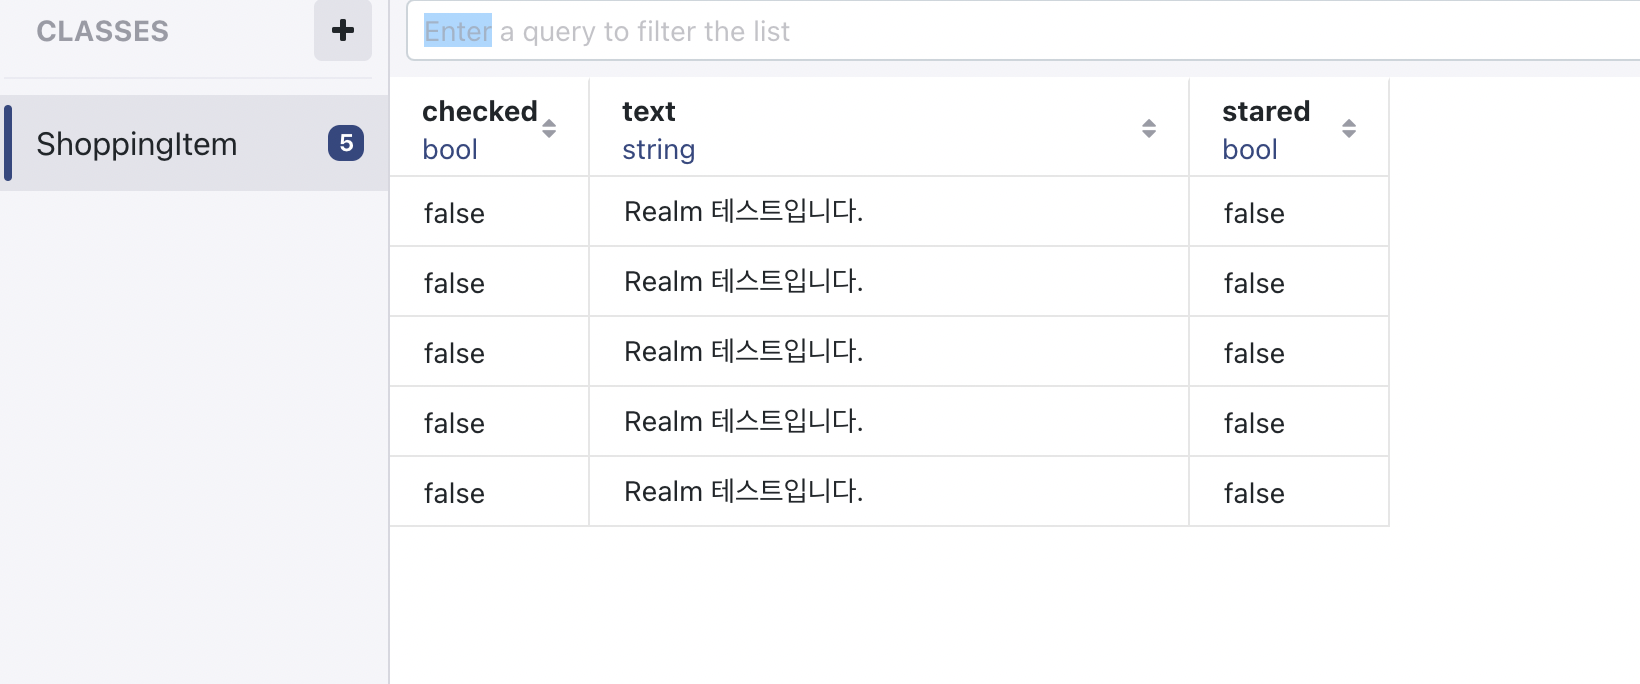
MongoDB Realm Studio로 해당 파일을 실행시키면, 값이 잘 추가되어있는 것을 확인할 수 있다.
추가한 데이터 불러오기
데이터베이스에 데이터들을 추가했으니 사용할 수 있어야 한다. 그럼 어떻게 불러올 수 있을까?
우선, 받아올 데이터를 담아줄 변수를 선언해준다.
var tasks: Results<ShoppingItem>!그리고 viewDidLoad에서 데이터를 불러와 tasks에 할당해주면 된다.
tasks = localRealm.objects(ShoppingItem.self)그리고 시뮬레이터를 실행시켜 print문으로 tasks를 확인해보면,
Optional(Results<ShoppingItem> <0x15b7215a0> (
	[0] ShoppingItem {
		checked = 0;
		text = Realm 테스트입니다.;
		stared = 0;
	},
	[1] ShoppingItem {
		checked = 0;
		text = Realm 테스트입니다.;
		stared = 0;
	},
	[2] ShoppingItem {
		checked = 0;
		text = Realm 테스트입니다.;
		stared = 0;
	},
	[3] ShoppingItem {
		checked = 0;
		text = Realm 테스트입니다.;
		stared = 0;
	},
	[4] ShoppingItem {
		checked = 0;
		text = Realm 테스트입니다.;
		stared = 0;
	}
))
이런식으로 데이터가 잘 들어오는 것을 확인할 수 있다.
가져온 데이터를 TableView에서 활용하기
기존에 테이블뷰에서 사용하던 데이터를 tasks에 맞춰서 코드를 작성하면 된다.
func tableView(_ tableView: UITableView, numberOfRowsInSection section: Int) -> Int {
        return tasks.count // tasks의 갯수만큼 리턴!
    }
func tableView(_ tableView: UITableView, cellForRowAt indexPath: IndexPath) -> UITableViewCell { guard let cell = tableView.dequeueReusableCell(withIdentifier: "ShoppingTableViewCell", for: indexPath) as? ShoppingTableViewCell else { print("기본 셀 반환") return UITableViewCell() } let data = tasks[indexPath.row] //Cell CheckButton Config if data.checked { cell.checkMark?.setImage(UIImage(systemName: "checkmark.square.fill"), for: .normal) } else { cell.checkMark?.setImage(UIImage(systemName: "checkmark.square"), for: .normal) } cell.checkMark?.tag = indexPath.row cell.checkMark?.addTarget(self, action: #selector(checkButtonClicked(_:)), for: .touchUpInside) //Cell Label Config cell.shoppingLabel?.text = data.text cell.shoppingLabel?.numberOfLines = 0 //Cell StarButton Config if data.stared { cell.starMark?.setImage(UIImage(systemName: "star.fill"), for: .normal) } else { cell.starMark?.setImage(UIImage(systemName: "star"), for: .normal) } cell.starMark?.tag = indexPath.row cell.starMark?.addTarget(self, action: #selector(starButtonClicked(_:)), for: .touchUpInside) return cell }이렇게 작성해준 뒤 시뮬레이터를 켜주면
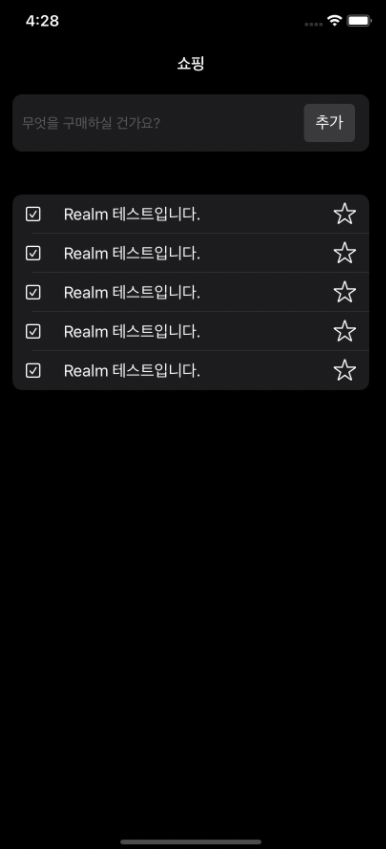
이렇게 테이블뷰에서 Realm 데이터베이스에 있는 데이터를 나타내고 있는 것을 볼 수 있다.🤠
추가 - Realm 데이터베이스 레코드 값 수정
4가지의 방법이 있다.
func tableView(_ tableView: UITableView, didSelectRowAt indexPath: IndexPath) {
        // 원래는 화면 전환 + 값 전달 후 새로운 화면에서 수정이 적합

        let taskToUpdate = tasks[indexPath.row]

         1. 레코드에 대한 값 수정
        try! localRealm.write {
            taskToUpdate.title = "수정된 데이터"
            taskToUpdate.content = "위메이드가 지난 8월 전세계 170여개국, 12개 언어로 출시한 '미르4'는 180개 서버와 100만명의 동시접속자를 기록하며 글로벌 시장에서 흥행중이다. 특히 블록체인 기반의 NFT(대체불가능토큰) 기술을 이용한 '플레이투언'(Play-to-Earn·돈 버는 게임)으로 각광받고 있다."
            tableView.reloadData()
        }

         2. 일괄 수정
        try! localRealm.write {
            tasks.setValue(Date(), forKey: "writtenDate")
            tasks.setValue("새롭게 일기 쓰기", forKey: "title")
            tableView.reloadData()
        }

         3. 수정: pk 기준으로 수정할 때 사용 (권장 X)
         기입해둔 값이 아닌 다른 값들은 초기값으로 돌아온다.
        try! localRealm.write {
            let update = Diary(value: ["_id" : taskToUpdate._id, "title" : "타이틀 변경"])
            localRealm.add(update, update: .modified)
            tableView.reloadData()
        }

         4.
        try! localRealm.write {
            localRealm.create(Diary.self, value: ["_id" : taskToUpdate._id, "title" : "타이틀 바꿈"], update: .modified)
            tableView.reloadData()
        }
    }
1번 방법이 가장 많이 쓰이는 방법이다.😃
'iOS > Swift' 카테고리의 다른 글
Google Maps SDK for iOS 정리 (0) 2022.01.22 앱에 데이터 백업, 복구 기능 추가하기(Swift) (0) 2022.01.22 TableViewCell 내부의 UIView에서 Gesture로 이벤트 처리하기 (0) 2022.01.22 Swift SocketIO를 활용한 실시간 채팅 앱 구현 (0) 2022.01.15 Swift Localization 처리하기(로컬라이징, 현지화) (0) 2022.01.14